| |
| Home | Download | Login |
|
Data Protection Software: Folders Page
|
Previous Top Next |
The folders page is where you configure what you want to backup.

Data Protection operates by taking each top-level folder in the folders list and scanning all files and in
the directory specified by that folder's path (as well as in all of its subdirectories). The backup policy for that
top-level folder determines if each scanned file is included or excluded in the backup. If any file that the
policy includes in the backup set has changed since the last backup, then the software will upload and store
the changes to that file.
IMPORTANT: Data Protection uses the modification date and time of the file to determine if the file
has changed since the last backup. Certain server software packages, such as Microsoft Exchange and SQL
server, do not update the modification date of the file even though they are writing data to the file. In
general this is true for any application that will keep a file open without re-opening it for days, weeks, or
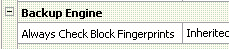
even months. If you are going to backup this kind of data, you need to turn on the Always Check Block
Fingerprints option in the properties for the folder(s) that contain this kind of data (right click the folder,
choose Properties). Note that our software will normally detect automatically when to use this technique for
Exchange and SQL server, but for other types of data that keeps files open all the time you will need to turn
this on manually. Please refer to our knowledge base for more information.
Folder list:
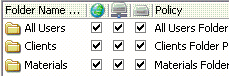
The main feature of the Folders page is the folder list. This contains a list of all top-level folders in your
backup. For each top-level folder the list displays the name of the folder on the remote server, the backup
policy assigned to that folder, and the path of the directory where Data Protection will start to look for
data to place into this folder on the remote server.
The list also contains three columns that each contain a checkbox -- one column for each data destination
(the columns are in the following order: remote backups, local server backups, local disk backups). You can
easily exclude a top level folder from a particular backup destination by unchecking the appropriate box for
that particular folder. Please note that Visualize! is not affected by the state of these checkboxes.
Backup policies:
Each folder is assigned its own backup policy. A backup policy is a set of rules that either exclude or include
a file based on its filename, filesize, or modification date. There are also rules that apply to another policy.
Each policy also includes a rule to apply the default policy, so if you want to add an exclusion that applies to
all folders, you should edit the default policy. Policies can also be used to customize versioning settings and
other properties for individual files or files that match a policy rule. See below for more details on how to
edit policies.
If you have local backups configured in addition to remote backups, then you can easily add rules to a policy
that are specific to remote backups, local server backups, or local disk backups. This is accomplished
through sub-policies. A sub-policy first includes the main policy it is associated with, and then it contains a
list of additional rules that should be applied. Each policy contains three sub-policies (one for each backup
destination). When local backups are configured, when you choose to edit a policy or you Visualize!, then it
will show a menu so that you can choose to edit the main policy for all backup destinations, or whether you
want to edit the sub-policy for a specific destination.
Strategies for data selection:
There are a few strategies for determining which top-level folders to add to the Folders page. One strategy
is to just add the root of each drive (e.g., X:\) or network share (e.g., \\server\sharename) and then use Visualize! or the policy editor to exclude those folders and files that you don't want to include.
Another strategy is to add only those top-level folders that include just the data you are interested in
backing up. For example, if all of your documents for all of your users were located in subdirectories off of
the C:\Users folder, then you would add C:\Users as a top-level folder. Or for example, if you want to
backup a Microsoft Exchange information store, then you would add the MDBDATA folder as a top-level
folder. This has the advantage that it is easier to customize versioning settings for a given set of data, and
also it is easier to move the location of a top-level folder if that is ever necessary.
The strategy where you add the root of a drive or network share has the advantage that it is easy to setup
policy rules to backup based on file type (e.g., search-based backup). However, the disadvantages are that
if certain subfolders on the drive have to be moved to a different drive (e.g., X:\Users is moving to Y:\Users
but everything else on X:\ is remaining the same) then the data will have to be backed up again, because
you can only move the locations of top-level folders but you cannot move the locations of subdirectories
within a top-level folder.
In general, the second strategy is preferred over the first strategy, as it provides more flexibility and greater
efficiency.
Adding folders:
You can either use the Add button or the Visualize! button to add new top-level folders to the list. When
you click Add the software will display a dialog showing your filesystem in the left pane and the folder list
on the right pane. In the left pane any files currently in the backup set will be highlighted in green. Note
that in this dialog, the coloring will not be red if you have excluded a file or folder (to see this, use Visualize!
instead of Add). You can also use the edit box in the lower left-hand corner to manually type the path of the
folder you want to add (this is the easiest way to add a UNC network path).
Alternatively, you can use the Visualize! feature to add folders to your list -- start Visualize! and then simply
check the top-level folder that you want to add.
Customizing properties for folders:
You can customize settings that affect the backup (such as file versioning settings) for a particular folder by
right clicking on the folder and choosing Properties. This will display the properties editor window. The left
pane of this window shows you which set of properties that you are editing. By default when you open the
window you will be editing the set of properties for the folder that you had selected. You can also change
this to be editing the properties of the policy or the global properties (which you can also changes on the
Options page).
Properties are inherited and can be refined for a particular policy or folder. For example, all folders by
default will have all of their properties set to Inherit. This means that the actual value of the property is the
value of the next-higher property set in the chain of properties (the order from highest to lowest goes:
Global, Policy, Folder).
For example, if you wanted to keep 2 years worth of versions for all of your data, but then only keep 14
days of versions for your Exchange server information store, you could right click the folder containing your
Exchange information store, choose Properties, and change the Numbers of Days to Keep Historical Versions
from Inherit to 14.
In the properties editor if you want to change the value back to Inherit then:
· For textboxes, delete all of the characters from the box and press TAB.
· For checkboxes, keep clicking the box until it changes to Inherit.
· For dropdown listboxes, choose Inherit from the list of choices.
If you have local backups configured, then you can choose to customize the properties of a folder for a
particular backup destination. For example, you could choose to store two years worth of historical versions
for all backup destinations, but then customize the remote backup destination so that it only retained 14
days worth of historical versions. This allows you to store more copies of your data on less expensive local
storage, while only what is necessary remotely.
Visually editing backup policies (Visualize!):
You can graphically see and edit your backup policies using the Visualize! button. Visualize! is useful for
three tasks:
· For excluding certain folders or filetypes from your backup
· For tallying up the total amount of current data that is in the backup set
· For quickly verifying that any manual changes to a backup policy are correct
When you press the Visualize! button it brings up a dialog showing an explorer-type view of your filesystem,
as well as an informational pane at the bottom of the window. Within the view of your filesystem, each
folder or file will take on one of three colors:
· Gray: This color indicates that the folder or file is not included in any of your top-level folders. You
can check the box to the left of a gray folder to add it to your list of top-level folders.
· Green: This color indicates that the folder or file is included in your backups.
· Red: This color indicates that the folder or file is included in one of your top-level folders, but it is
excluded from the backup because of a policy rule.
To include an excluded file or include an excluded file, right click the file of interest and use the appropriate
include or exclude commands from the popup menu. It will present you with different rules that you could
add based on different possible patterns derived from the filename of the file that you right click (for
example if you right clicked a file named classic.mp3, then it would let you add a rule to exclude just
classic.mp3, *.mp3 (all mp3 files), classic*.mp3, etc. Also, the rule can either be just for that folder (e.g.,
only for that one directory that contains the file that you right clicked and not any of its subdirectories or
parent directories) or for all folders (in which case the rule will apply to all directories within the top-level
folder that contains that file). It will also allow you to add a custom rule, in which case it will bring up a
window allowing you to edit the new policy rule.
You can also include/exclude files by checking or unchecking a file or folder. When you do this the software
will bring up a window allowing you to customize the policy rule that it is going to add. If you only want to
quickly exclude the one file or directory that you check or uncheck, then you can hold down the ctrl key
while you click and it will skip the rule customization dialog.
TIP: If you want to exclude or include certain files or kinds of files in all top-level folders, then you should
use the manual policy editor to edit the default policy (see below). Also, if you need to exclude or include
certain files based on criteria other than the filename, you will need to use the manual policy editor.
Visualize! also provides for unlimited undo and redo -- if you make a mistake, right click the window and
choose Undo to undo the last change. Likewise the Redo command will re-apply the last change that you
undid. You can Undo and Redo an unlimited number of times. This allows you to experiment with tricky
policy rules until you get exactly what you want.
The bottom part of the window displays detailed information about the currently selected folder or file,
indicating which top-level folder(s) contain the folder or file, as well as which policy rule caused the file to be
included or excluded. If you are having trouble determining why a file is included or excluded, left click the
file to select it, and then look to see which policy rule is affecting that file.
The bottom part of the window is also used to display an estimate of the total amount of current data that is
in the backup set. This is calculated in the background while the window is open. As this background
process discovers information it will populate the Data to Backup and Excluded Data columns in the list.
TIP: If you include or exclude files after you open the Visualize! dialog, then you will need to tell the
software to recalculate the disk usage amounts once you are finished making changes. You do this by right
clicking the window and choosing the Refresh Disk Usage command. This will update the grand totals as
well as the individual totals in the Data to Backup and Excluded Data columns.
NOTE: The Visualize! dialog does not display how much data is actually stored on the remote server. It
does help you understand how much data will need to be uploaded for the initial backup, and once your
initial backup has finished, the total amount of data in Visualize! should closely match the amount of current
data in your account. The actual amount of data that is stored on the server can be understood by using the Reports tab of the System Status page, as well as the disk usage inspector tool.
Manually editing backup policies:
The manual policy editor is the most powerful way to configure policies but it is also the most complex. To
edit a policy, right click a folder and choose Edit policy. If you have local backups configured, this menu will
let you choose whether you want to edit the main policy for all backup destinations, or whether you want to
edit a sub-policy for one specific destination.
TIP: To edit the default policy, right click and Folder and choose Edit policy, then highlight the Apply Default
Policy rule, and click the Edit Default Policy button in the lower-right hand side of the window.
The policy editor window has the functionality to edit, export, and import the backup policy for a particular
top-level folder. The top-level folder that you are editing is displayed at the very top. Immediately below this
is a dropdown list indicating which policy should be used when backing up the top-level folder. Normally,
each top-level folder is assigned it's own backup policy. Buttons to the right of the policy list allow you to
add a new policy, delete a policy, rename the policy, export the policy to a file, or import a policy from a file.
The main portion of the window is composed of the rule list on the left and the rule editor on the right. The
rule editor allows you to edit the currently selected rule in the rule list.
When a policy is applied in order to determine whether a file or folder should be backed up, the rules are
applied from top to bottom. This means that rules at the bottom of the list will override rules at the top of
the list. So if you wanted to exclude all music files (*.mp3) but then include all MP3s in the Recordings
folder, then you would want to put the include rule for the Recordings folder below the exclude rule for
*.mp3.
There are two types of rules: wildcard rules and apply policy rules. Wildcard rules are used to exclude or
include files or folders based on a file's name, size, or modification date and time. Apply policy rules are
used to apply all of the other rules in another policy. By default every policy will also apply the Default
Policy, allowing you to easily exclude certain files from all top-level folders by editing the default policy.
After you edit your policy, we strongly recommend using Visualize! to verify that your policy rules are
working as expected.
Wildcard rules:
A wildcard rule is used to either include or exclude files and folders matching certain criteria. Use the
dropdown at the top of the rule editor to change whether the rule will include or exclude files and folders.
The dropdown list to the immediate right of the include/exclude dropdown indicates whether the rule will
apply to both files and folders, just folders, or just files.
Wildcard rules match on either the relative path or absolute path of a file or folder. The absolute path is
simply the filesystem path you would normally use to open a file. The relative path is the remaining path
after the path of the top-level folder is excluded.
For example, say that you had a top-level folder "Users" that was backing up the C:\Users folder, and you
wanted to add a rule that excluded the C:\Users\MusicFan\My Music folder. The absolute path would be
C:\Users\MusicFan\My Music. The relative path would be \MusicFan\My Music since this is the part of the
path that comes after the path of the top-level folder (C:\Users).
Visualize! will usually add wildcard rules that use relative paths. Relative paths are more robust because if
the location of the top-level folder changes the policy rule will not need to be changed (this is not true for
absolute paths). Note that if you are creating a rule that will apply to files in any folder (e.g., "*.mp3") then
it does not matter whether you use an absolute path or a relative path.
The textbox on the third line of the rule is where you actually type the wildcard pattern. The * character
matches any number of any characters. The ? characters matches exactly one of any character. The * and ?
can also be used in conjunction with the directory separator character (either \ or /) to create powerful and
precise patterns. Here are some guidelines and examples (in the example, c:\Users is the path of the top-level directory):
· The pattern "abc*" will match files or directories that start with abc and that have any file
extension.
· The pattern "*.txt" will match all files or directories that have a file extension of "txt"
· The pattern "*.*txt" will match all files or directories that have a file extension that ends with "txt"
· The pattern "abc*.*txt" will match all files or directories that start with abc and have a file
extension that ends with "txt"
· The pattern "*20??.dat" would match "abc-2000.dat" and "abc-2010.dat" but it would not match
"abc-20100.dat"
· A pattern that starts with "*\" or that contains "\*\" will match any number of directories (one or
more levels of directories). For example, "*\My Music" will match files in any My Music directory no
matter how deeply nested it is (e.g., it would match all of the following: C:\Users\My Music,
C:\Users\MusicFan\My Music, C:\Users\MusicFan\My Documents\My Music, etc.).
As another example, "*\Classical\*\Beethoven" would match both:
"C:\Users\MusicFan\My Music\Classical\1800-Favorites\Personal\Beethoven" as well as
"C:\Users\MusicFan\My Music\Classical\1800-Archive\Beethoven"
As another example, "*\Classical\*\Beethoven" would match both:
"C:\Users\MusicFan\My Music\Classical\1800-Favorites\Personal\Beethoven" as well as
"C:\Users\MusicFan\My Music\Classical\1800-Archive\Beethoven"
· If you have one or more non-star characters, followed by a * and then a directory separator (or
you have a * followed by one or more non-star characters followed by a directory separator), this
will match exactly one directory level. For example, "*\Classical\1800-*\Beethoven" would match
"C:\Users\MusicFan\My Music\Classical\1800-Archive\Beethoven"
"C:\Users\MusicFan\My Music\Classical\1800-Favorites\Beethoven"
but it would not match
"C:\Users\MusicFan\My Music\Classical\1800-Favorites\Personal\Beethoven"
"C:\Users\MusicFan\My Music\Classical\1800-Archive\Beethoven"
"C:\Users\MusicFan\My Music\Classical\1800-Favorites\Beethoven"
but it would not match
"C:\Users\MusicFan\My Music\Classical\1800-Favorites\Personal\Beethoven"
· This principle also applies to the use of the ? character. If you want to include any directory name
but you only want it to match one directory and no subdirectories, then use "\?*\".
For example, "*\Classical\?*\Beethoven" would match:
"C:\Users\MusicFan\My Music\Classical\1800-Archive\Beethoven"
"C:\Users\MusicFan\My Music\Classical\1800-Favorites\Beethoven"
but it would not match
"C:\Users\MusicFan\My Music\Classical\1800-Favorites\Personal\Beethoven"
For example, "*\Classical\?*\Beethoven" would match:
"C:\Users\MusicFan\My Music\Classical\1800-Archive\Beethoven"
"C:\Users\MusicFan\My Music\Classical\1800-Favorites\Beethoven"
but it would not match
"C:\Users\MusicFan\My Music\Classical\1800-Favorites\Personal\Beethoven"
We highly recommend testing complex rules using the Visualize! feature before backing up to make sure
that they are worked as you would expect them to.
In addition to specifying a wildcard pattern, you can also use matching criteria based on a file's modification
date and time (either relative to the current date and time when the backup is being processed or an
absolute date and time).
If you are adding an exclude rule in order to exclude files that were backed up previously and you no longer
want to back them up, then you should check the Destroy files excluded by this rule option. This indicates
that any files that were previously backed up but are now excluded by this rule should be removed from the
backup. You can turn this option on for all policy rules by using the Versioning tab
of the Options page or by
editing the folder properties.
If you are confident that a particular folder will never contain any files that need to be backed up, then you
can increase the efficiency of the backup by adding an exclude rule and turning on the Rule cannot be
overridden option. This indicates that if this rule matches a file or folder, and rules below this rule in the rule
list will be ignored. If you use this to exclude a directory, then the backup will not even check inside the
directory for files and folders that might be part of the backup -- it will immediately skip the directory
instead.
Use the Rule cannot be overridden feature with caution. For example, if you exclude the C:\Users\Archive
folder and enable this option for that rule, but then add an include rule for *.doc, any *.doc files in the
C:\Users\Archive folder will not be backed up because the exclude rule for the Archive folder cannot be
overridden.
Finally, if this wildcard rule is an include rule, then the Change Backup Settings for Rule will be active. This is
used to customize the backup properties for files matching this wildcard rule. See more details about this
feature below.
Apply policy rules:
An "Apply policy" rule is used to include all of the other rules in some other policy in this policy. This is used
by default to include all of the rules from the Default Policy in each top-level folder's backup policy. Note
that it does not include the first rule from the referenced policy if the rule is "include *.*" or "exclude *.*".
For example, even though the first rule of the default policy is "Include *.*" this rule is ignored and it will
not affect any exclude rules you have before the "Apply Default Policy" rule.
You can use the Edit ... Policy button to actually edit the rules of the referenced policy. The easiest way to
edit the default policy is to therefore edit any policy, highlight the 'Apply Default Policy' rule, and then click
this button.
As an advanced option, you can choose to only include the exclude wildcard rules or the include wildcard
rules from the referenced policy. Also, you can indicate that you want to invert the meaning of these rules
(meaning exclude rules become include rules and vice versa). These options are advanced and should not
normally be changed.
Customizing properties for files matching a policy rule:
Wildcard rules can also be used to override folder properties (such as versioning settings). This is
accomplished by adding an include wildcard rule matching the folders and files that need the customized
properties, and then by clicking the Change Backup Settings for Rule button at the bottom of the rule editor
(if the button does not appear, please move your mouse over the area and/or resize the window --
sometimes the controls do not refresh correctly and the button is not visible until you move your mouse
over it). Clicking this button will bring up the properties editor window, allowing you to override the folder
properties for files matching this include rule. Note that the button is disabled for exclude rules, because the
properties only affect files that are backed up.