| |
| Home | Download | Login |
|
Data Protection Software: My Account Page
|
Previous Top Next |
The My Account page allows you to access and modify those variables that make each account unique.
The use of the Data Protection Software services is authorized through your account.

It's very important that each computer is configured to use a different account (otherwise, data with the
same filenames could get mixed together, and backup monitoring and notifications will not work properly).
You will receive a parent account for your first computer being backed up, and you will be provided with one
additional sub-account for each additional computer you need to backup. New sub-accounts can be created
instantly through the Web Portal.
Your data is secured through two distinct things: your account password, and your pass phrase:
· Account Password: This is what authorizes you to login to your account and upload or destroy data.
The account password can be reset if needed by our support team.
· Pass Phrase: The pass phrase is used to define the encryption key that encrypts your data (we use
the PBKDF2 algorithm to convert the pass phrase into a 256-bit encryption key). You configure the pass
phrase only one time when you initially configure your backups. Once the pass phrase has been
configured, it should not be changed. (If you change your pass phrase, all of your data must be backed
up again.)
It is very important that you know your exact pass phrase. Without your pass phrase you will not be able to recover your data. Once you have configured your pass phrase, you can use this page to export your pass phrase to a file or securely re-save it to our data center.
It is very important that you know your exact pass phrase. Without your pass phrase you will not be able to recover your data. Once you have configured your pass phrase, you can use this page to export your pass phrase to a file or securely re-save it to our data center.
This page allows you to configure your where the data is backed up to, configure your account credentials,
and set or save your pass phrase.
Configure Data Destination:
If you are only performing remote backups, then normally this section does not need to be customized. The
remote backup server name is the network hostname or IP address. If you need to route remote backup
traffic on a different TCP port other than 443, then you can add ':5470' to the end of the remote backup
server name and it will try to connect on port 5470 instead of 443. The system will only use ports 443 and
5470.
This section can also be used to configure local
server or local disk backups. Local disk backups can be used
to also backup your data directly to some filesystem location (such as a USB disk or network share). Local
server backups are useful for more complex environments where you need to securely route local backup
traffic over your IP network using our custom network protocol.
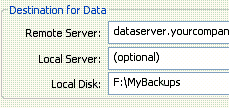
The local server field accepts a network hostname or IP address or a computer that is configured to run the
local backup server. The local disk field accepts a filesystem path (such as F:\MyBackup or
\\server\sharename\folder). Once you have something configured in the local server or local disk backup
fields and you save your changes, then additional tabs will appear on the Schedule page
and System Status
page.
NOTE: If you configure local backups, be sure to choose whether or not you want to encrypt local backup
data at the bottom of this page.
Configure Account Credentials:
In the middle section of this page you enter your username and password. If your password is a temporary
password, then it will ask you to change your password. You can also use the Change Password button to
change your password. If you have forgotten your password, our support team can reset it for you.
IMPORTANT: Each computer (or settings profile) should be configured with a different username.
Otherwise, data with the same filenames could be mixed together, and backup monitoring and notifications
won't work correctly.
Set, Save or Change your Pass Phrase:
In the bottom section of the page you can create, export, and verify your pass phrase. You also choose
whether or not you want to encrypt data that is backed up to the local server or local disk.
Configuring your pass phrase is the most important part of the configuration process. Please see our getting
started guide for a walkthrough of how to properly configure your pass phrase.
Once data has been uploaded under a given pass phrase, you will not be allowed to use a different pass
phrase on that account until our support department has reset the "pass phrase lock" on your account. This
feature provides protection against accidental or malicious changing of the pass phrase without the account
owner's knowledge. It avoids the situation where you have to restore your data only to find out that
someone else changed your pass phrase without your knowledge.
If you want to intentionally change your pass phrase, please contact us to have the change of pass phrases
approved. Once the change has been approved, you can use the Change Pass Phrase button to change to a
new pass phrase. Note that this will schedule a full backup so that all of your data will be uploaded with the
new pass phrase. To avoid keeping two copies of your data, we recommend first destroying all of your data
before changing your pass phrase (or you can ask support to create a new account for you and delete your
old one).
If you have already configured your pass phrase and want to securely save it to the server again (for
example so you can setup different security questions for pass phrase recovery), then click Change Pass
Phrase but then enter your current pass phrase. (You may want to use the Verify button to verify that you
know your existing pass phrase correctly before you do this.) If you enter your same pass phrase correctly,
the software will not warn you that you are changing your pass phrase, but instead will proceed directly to
the security questions and answers dialog. When you re-save your pass phrase to the server in this way it
will not interrupt your incremental backups (a new full backup is not required).
Use the Verify button to check that you know your exact pass phrase at any time. This button will show a
dialog that lets you type in a pass phrase. It will automatically highlight in green or red whether or not the
pass phrase that was typed in matches the pass phrase that is being used to backup your data.
If you want to save your pass phrase to a file for safe keeping, this can be done in two ways: first, you can
use the Save button on the bottom section of this page to save your pass phrase to a text file. Note that this
text file will only contain the binary form of your pass phrase (see note below). Alternatively, you can use
the File -> Export Profile menu command to save your pass phrase and all of your settings to a file.
NOTE: The actual text of your pass phrase is not stored in the software settings. Rather, the software
stores the "binary" form of your pass phrase (it stores a cryptographic hash of your pass phrase). This
ensures that if you used any sensitive information in your pass phrase (such as your social security number)
that information will not be stored on your hard disk somewhere. The binary form cannot be converted back
into the text of the pass phrase, so any sensitive information is not exposed. For details, please search the
Internet for information about the PBKDF2 standard.