| |
| Home | Download | Login |
|
Getting Started: Exclude unwanted data
|
Previous Top Next |
Next you will exclude data that does not need to be backed up. For example, you may not want to backup
mp3 music files. Exclusions are handled via folder policies.
A folder policy is a list of inclusion and exclusion rules. You can exclude (or re-include) files based on several
criteria: filenames (via wildcard matching), date/time, and size. A policy can also include rules from other
policies. By default each backup folder is associated with its own policy, which includes the rules in the
Default Policy.
The Default Policy excludes things such as temporary files, the recycle bin, Internet caches, windows system
files, and windows registry files. Advanced users can modify the Default Policy to make system wide
exclusions.
 Warning: Be careful not to exclude
data that you really need to backup. Most users will not need to
edit policies directly and should use the Visualize! feature instead. After making any changes to a policy
you should always use the Visualize! feature to confirm your change is correct.
Warning: Be careful not to exclude
data that you really need to backup. Most users will not need to
edit policies directly and should use the Visualize! feature instead. After making any changes to a policy
you should always use the Visualize! feature to confirm your change is correct.Please follow these steps to exclude unwanted data:
1. Click the Folders button to navigate to the correct panel:

2. Click the Visualize! button on the right. The Visualize! dialog window will appear. This dialog presents a
unified view of all of the data on your file system. You can browse your file system and see exactly what
folders and files will be backed up. The files and folders are highlighted with the following colors:
· Green: These items will be backed up.
· Red: These items are excluded from the backup.
· Gray: These items will not be backed up because they are not within any backup folder.
Also, there are three additional columns of information:
· File Size: Size of file. Blank for folders.
· Data to Backup: Amount of data to backup within the folder and all of its subfolders. Blank for files.
· Excluded Data: Amount of data excluded from backup within the folder and all of its subfolders.
Blank for files.
At the bottom of the dialog are two information boxes:
· Top: Displays detailed information about a file or folder: whether it's included in the backup, what
backup folders contain the item, whether it's included or excluded, and what rule causes the
inclusion or exclusion.
· Bottom: Displays size information for the selected item. It also displays size information for all
backup folders in your system, to help you estimate how much data will be backed up.
3. You can add exclusion rules (or add inclusion rules to re-include excluded files) by right clicking on a file
or folder. If you right click on a folder then you will create a rule that excludes/includes folders (and their
subfolder and files). If you right click on a file then you will create a rule that excludes/includes files.
Tip: You can undo and redo any operation. Just right click and select Undo or Redo.
As an example, we will exclude all mp3 files from a backup:
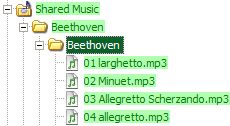
Since we want to exclude a type of file, we will right click on one of the mp3 files:
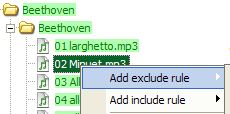
We choose Add exclude rule from the popup menu:
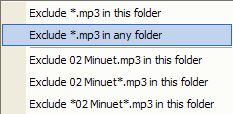
Because we want to exclude all mp3 files in any folder and not just the Beethoven folder, we choose Exclude *.mp3 in any folder. The menu lists several other variations that allow you to exclude only that file,
mp3 files that begin with 02 Minuet, mp3 files that contain 02 Minute, etc.
The Create a new filter rule dialog appears after selecting a menu item. This allows you to customize the
wildcard before it is created. It also shows you what policies and backup folders will be affected.
A wildcard allows you to use * to match any character any number of times (including zero times) and a ? to
match exactly one character.
Continuing our example, this is what the screen will look like after adding the rule:
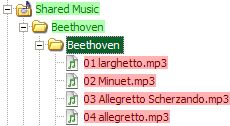
Now all mp3 files have been excluded from our backup of the All Users backup folder. However, let's say
that we are a real fan of Edvard Grieg and want to backup our Grieg-Classics of a Lifetime album. Here is
what it currently looks like:
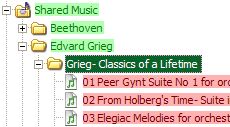
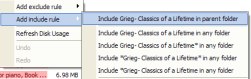
Now we right click on the Grieg-Classics of a Lifetime folder, choose Add include rule, and then Include
Grieg-Classics of a Lifetime in parent folder:
Now all files within this folder are included (and will appear green). If you only wanted to include the mp3
files in this folder then you would have right clicked on one of the mp3 files, chosen Add include rule, then Include *.mp3 in this folder (when we added the exclusion rule it was Exclude *.mp3 in any folder)
4. Use the Data to Backup and Excluded Data columns to identify files and folders that need to be excluded
(if you see a large amount of data where it's not expected drill down into the subfolders to find out where it
comes from, and see if you need to exclude it, etc.).
Tip: When you exclude or include files the Data to Backup and Excluded Data columns will not update
automatically. Right click and choose the Refresh Disk Usage command to refresh the information.
5. When you think you have the filters setup correctly, right click and choose the Refresh Disk Usage
command. Wait for all calculations to complete. The disk information box is at the bottom of the dialog. It
should include a line of text that begins with Amount to backup in all folders. For example: Amount to
backup in all folders: Included=12.856 GB, Excluded=299.56 MB. You may have to use the scroll bar to the
right of the box to see this information.
This tells you exactly how much data will be backed up to the server and how much will be excluded. If you
are not satisfied create additional rules as described above and repeat this step.
6. Verify that all of your important data will be backed up by traversing your file system and making sure
that everything important is highlighted in green.
7. When you are sure everything is correct, click the Save button in the lower right hand corner. You should
be back on the Folders panel.
5. Click the Save button in the lower right corner:


