| |
| Home | Download | Login |
|
Getting Started: Specify backup data
|
Previous Top Next |
Next you will specify what content should be backed up. The general strategy is to specify which folders
should be backed up (which includes all of its subfolders and files), and then to come back and exclude what
you don't need afterward.
Advanced Feature: Additionally, you can individually list files to backup, but this should only be done for
files in folders where you don't want to backup most of the data, and where you don't want to backup
files that are created in that directory in the future.
Please follow these steps to specify what data to backup:
1. Click the Folders button to navigate to the correct panel:

2. Click the Add button on the right. The Add Folders dialog window will appear. The folders on your file
system will appear on the left, as in Explorer. Folders and files that will be backed up are highlighted in
green. The list of folders and files to backup appear on your right.
It will have one or more folders selected by default (what folders it selects depends on your operating
system and what data is installed). In general, it will make sure the following items are backed up by
default:
· Your user's My Documents, Desktop, Favorites, and Start Menu folders.
· Your user's Application Data folders (often stores email and other application and user specific
data).
· Common (Shared) My Documents, Desktop, Favorites, and Start Menu folders.
Note: On Windows XP or better all of this data will be contained in a user's profile directory, so only the
profile directory for your user and the common user is added. Because this includes subfolders, all of the
above data is also mentioned.
3. In the pane on the left select the folders on your file system that you want to backup and then click the
Add button in the middle of the dialog ( ), or you can right click and choose Add to backup list. Note that
when you add a folder all subfolders will be included in the backup. Don't worry about excluding data here.
This will be done in the next step.
), or you can right click and choose Add to backup list. Note that
when you add a folder all subfolders will be included in the backup. Don't worry about excluding data here.
This will be done in the next step.
), or you can right click and choose Add to backup list. Note that
when you add a folder all subfolders will be included in the backup. Don't worry about excluding data here.
This will be done in the next step.Tip: If you only want to include a folder but not its subfolders then just add the folder now and use
exclusions later to exclude the subfolders.
4. When you have specified all of the backup folders click Save. You should be back on the Folders panel.
The folders you selected will be now be listed in the window. The list shows the folder name on the Server,
storage mode options, folder policy name, and folder path.
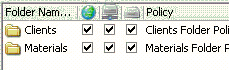
The storage mode icons indicate the possible location(s) were the backup for each folder is stored.
|
Icon
|
Storage Mode
|
 |
Remote Server
|
 |
Local Server
|
 |
Local Disk
|
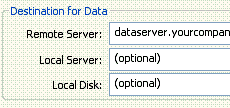
The storage modes are tied to the definitions of storage locations on the My Account page under the
heading of Destination for Data.
We recommend that you leave all three mode icons checked (which is the default). This way if you choose
to implement a second and/or third storage mode by defining values on the My Account page, the backup
will already be set.
5. Click the Save button in the lower right corner:

Click here for information on how to backup
SQL Server databases.

